You will find the template download link at the end of this article!

Why use an audio post template? Why not just start from scratch on a new project?
An audio post template is the key to be able to stick to deadlines and also having time to sleep at night. You simply don’t have the time to start from a blank session every time you work on a new project. We don’t want to lose any creative time. In this business there is no extra time.
Your own audio post template is your own technical system that acts as a foundation for efficiently doing creative sound work.
Once I had only 30 minutes for dialog editing and mixing a badly recorded 1 minute video. The 30 minutes included downloading and sending the files. This was only possible to do because of my template with proper busing and already inserted familiar plugins on the right tracks and buses.
Another reason for templates is to be able to make revisions in an instant. The director wants the backgrounds 2 dB louder? Well, since you have put all your background sound clips on the correct background tracks, all you need to do is raise the backgrounds VCA fader +2 dB, alternatively raise the BG MASTER BUS +2 dB.
Understand your DAW and plugins, learn your key commands, build your own template and work in an organized way
You must to be highly organized when editing and mixing. Every region need to be at the exact right track. Know your plugins, know your color coded tracks and know your key commands, understand how your DAW and DAW controller work. Yes get a DAW controller. I have mixed an hour long movie with only keyboard and mouse and I will never do that again. You just don’t have the same touch as you do with physical faders. Without a DAW controller it will take forever to get to that right feel, and sound is all about feelings. Remember you don’t have any extra time.
Every sound persons template is going to be different and your own template is also going to change over time when you develop your own style
and get better at editing and mixing and find new better ways of working.
Tip: Use different templates for different types of work. You can have a separate sound design template with lots of crazy plugins and software instruments already inserted. You can also use different templates with field recorders! I have one for VO recording, another for streaming and a third for basic 6 channel location recording on my SD833.
My current stereo 2.0 template and its features
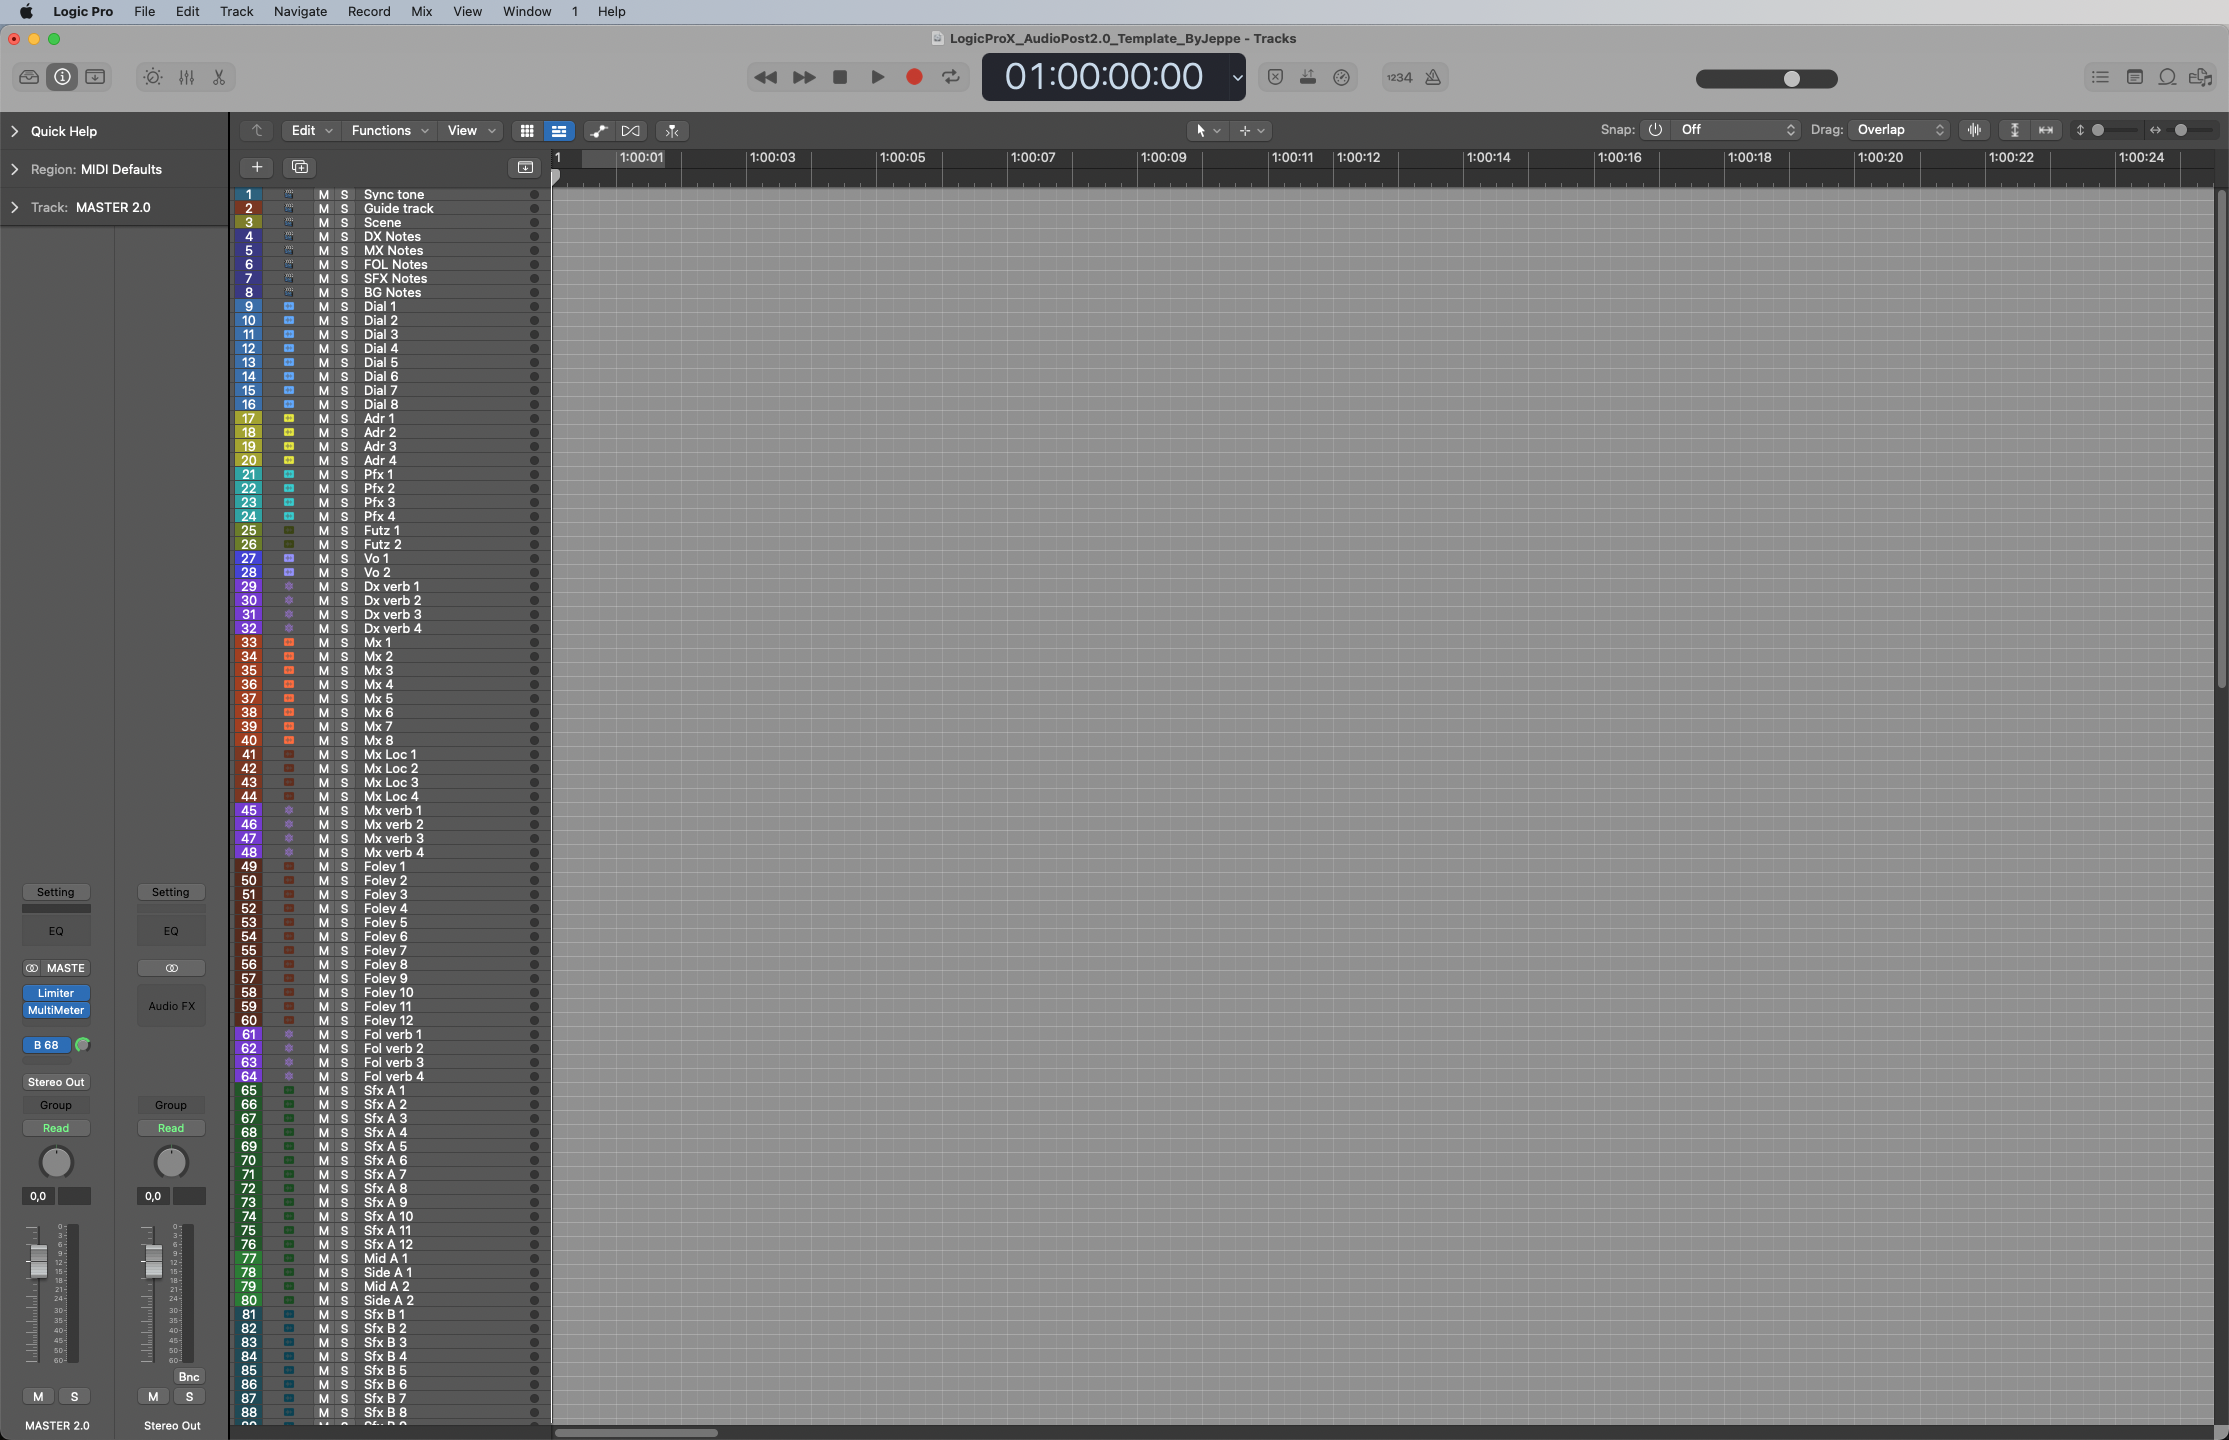
This is my audio post template used for stereo mixing. I use it mainly for video projects that will end up on TV (commercials) and YouTube.
Note! I use almost only third party plugins in my template, but these plugins you might not have installed on your system so I have removed them and put similar Logic stock plugins instead. The settings on these stock plugins are not tested so do not put too much attention to how these plugins are set up. Use your own plugins, try different things. The only thing I highly recommend is using limiters with -2dB True Peak on all Main Buses. I use plugins from FabFilter, Soundtoys, Acon Digital, iZotope, okesound and many more. I find third party plugins easier to use and have higher sound quality and features, and when you are working in a different DAW, you can have the same plugins!
How many tracks and buses are in this template?
- 140 audio tracks, the majority for hard sound effects.
- 20 reverb/delay returns (4 for dialog, 4 for music, 4 for foley, 4 for hard effects and 4 for backgrounds)
- 16 VCAs
- 22 mix buses (+ 20 hidden effect send buses)
- 4 stem printing tracks (dialog, music, effects and master printing)
- 1 guide track
- 1 sync tone track
- 6 tracks used for writing notes for specific sound groups
But this template is only stereo, what about 5.1 and Dolby Atmos?
If you need to make a 5.1, 7.1 or Dolby Atmos mix then things will get way more complicated (especially when printing multichannel stems) so I don’t really recommend Logic for that, although it is doable. This stereo template can work as a great base for expanding into multi-channel mixing. I have done a documentary sound edit and 5.1 cinema mix entirely in Logic on a Macbook Pro 2014 (and that is also something I will never do again). At the time of writing Avid Pro Tools is still an audio post industry standard and Steinberg’s Nuendo 12 is soon going to be released and multichannel mixing is also possible to do directly in Davinci Resolve.
How is the routing done? Dialog track 1 goes where?
I recommend you just download the template and look yourself at the routing in the mixer window. It is challenging to explain how all of this works because I feel that is a whole book ,but I will try to explain and keep it short:
Generally a soundtrack consists of 3 main types of sound:
Dialog, Music and Effects.
And these 3 main types can be further broken down into:
Dialog (4 main types):
- Narration / VO
- Dialog recorded in sync with picture (this is the Dial 1-8 tracks in my template)
- ADR (dialog that must be recorded again in sync with the picture, if the production dialog had problems that can’t be fixed in dialog editing)
- Dialog futz tracks (voices that come from speakers on screen, a small radio, speakers at airports, voices from a TV and so on).
Music (2 main types):
- Music happening outside of the movie (The soundtrack from a composer)
- Music happening inside the movie, for instance music coming from a radio in a car or a band that you can see playing. In my template I call these tracks Mx loc (Music location) and they need very different processing compared to the tracks from the composer.
Effects (4 main types):
- Room tone. I don’t have specific tracks for room tone as this type of sound usually gets recorded automatically with the production dialog, so this sound should be on the dial tracks in mono, but you can experiment and add extra stereo room tone for richness.
- Foley. These tracks you can also brake down further into footsteps, clothes, props and so on.
- Hard effects / SFX. These can be further broken down into specific groups of hard effects as only human sounds, only animal sounds, only cinematic effects and so on. In my template I have 6 groups of SFX.
- Backgrounds / ambience / atmosphere.
All these tracks need to go to their specific buses, and those specific buses need to go to their specific main buses, and those main buses need to go to the main master bus. It’s like a tree.
Dialog mixing example:
Production dialog tracks (Dial 1-8) -> DIAL BUS -> DIALOG MASTER BUS -> MASTER 2.0 BUS.
You can cut out bad sounding frequencies on the individual dial channels, and instead use multi-band, perhaps another more colourful EQ and use another de-noiser with different settings on the Dial Bus to create an overall dialog sound. I would not put anything else than a true peak limiter following a loudness meter on the DIALOG MASTER BUS.
All dialog reverb returns -> DIALOG 2.0 BUS -> MASTER 2.0 BUS. In this way the dialog reverb gets printed along with the dialog.
What are those M-S tracks on the first 4 SFX groups?
I like to record my own sound effects in mid-side stereo. I have separate tracks for processing mid-side effects on SFX GROUPS 1-4. You have 2 pairs of them so you can checkerboard. Note! You need a mid-side matrix plugin in decode mode on the Mid-Side Bus which I have removed from the downloadable template because there is no Logic stock mid-side decode plugin. I use the free Voxengo MSED 3.0 encoder-decoder plugin:
https://www.voxengo.com/press/voxengo-msed-3-0-free-mid-side-encoder-decoder-plugin-released-311/

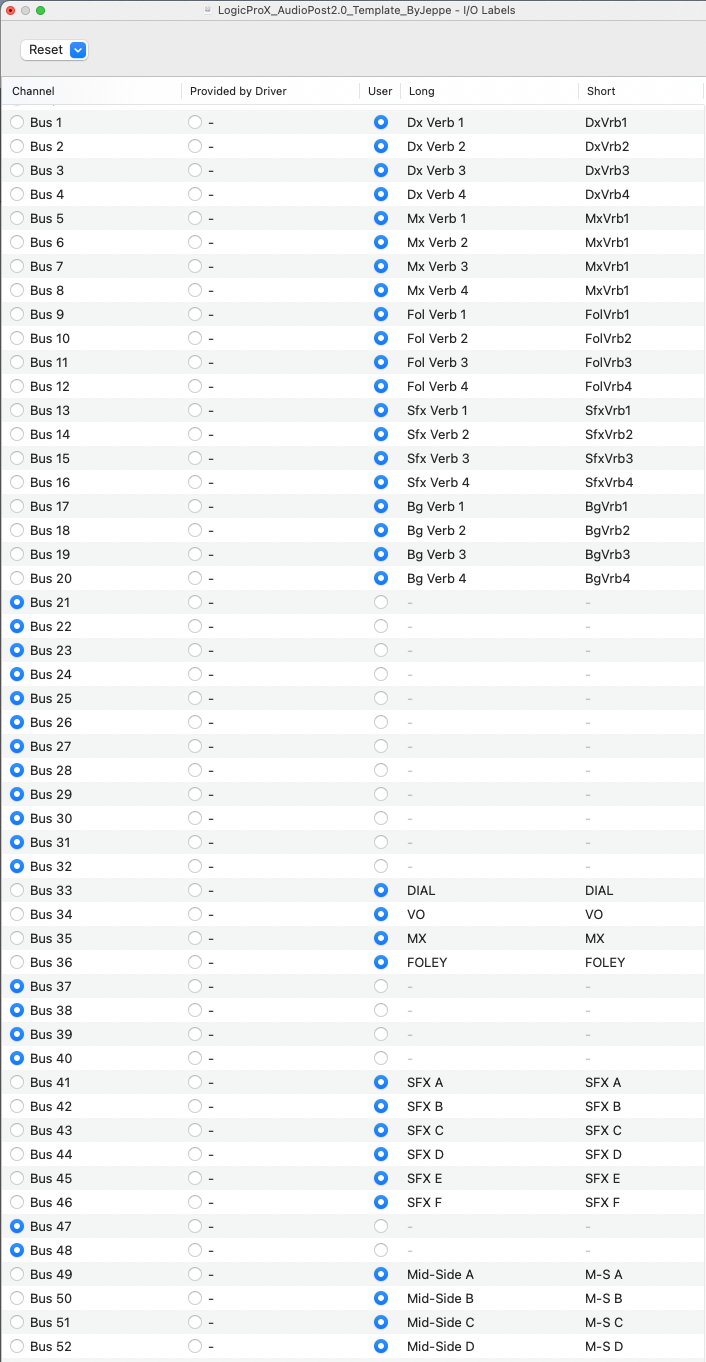
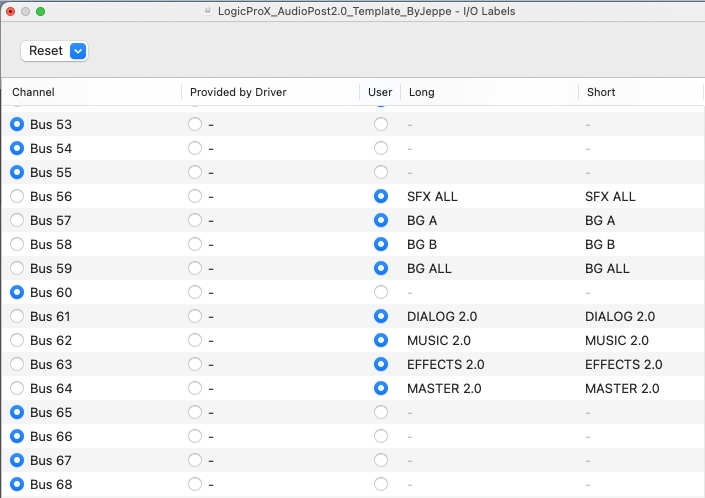
In / Out labeling
Download link
Download my Logic Pro X Audio Post 2.0 template here.
There are 4 files inside the 3,5 MB zip container: the template and three .png screenshots of the In/Out labeling.
Enjoy sound designing and mixing. Feel free to ask me questions or give me tips on how to improve my template.
7 Responses
Great site. Just starting a mix and couple of great pointers.
Thanks!
Hi Jesper, I’m starting an upcoming project and wondered If I could use this template, it’d help me so much just I’m on Logic 10.13.6 and can’t open your download.
Is there any way you could help me?
Thanks for your time.
Hi Nathan, newest Logic version is at this moment 10.7.9. I just tried the download and the template opens fine on my system. Do you mean you are on Mac OS 10.13.6? I am on Monterey 12.6.8. I think this template cannot be opened on older Logic versions, can you update Logic to the newest?
Sorry yes I’m on High Sierra running Logic Pro 10.6.
It would’ve been good to see the routing, couldn’t quite understand the I/O’s.
Thanks anyway
Hi Jesper, could I email you? I’m building my own template as I can’t open it as I’m running an older version of Logic and just have a few questions.
Thanks
Great template. Used it on a short recently and worked out really well. It was a nice upgrade to the template I made and was using in Logic earlier. A question I’ve been trying to figure out as I’m still new and learning audio post, how can you export DME Stems from the template in Logic? Thanks!
Hey thanks, stem export is something I have not figured out how to do properly in Logic. One way is to solo the buses and export them one by one manually. More time consuming but it works. I did it this way on a 1 hour documentary on a macbook pro 2014 and it took me 4 hours.